

Just another blog attempting to simplify Redux toolkit for you
A basic step-by-step guide on setting up and using redux without losing your mind.


As a beginner, I tried to understand redux on my own through docs and blogs.
I tried.
Eventually, I learned it from Akshay Saini's boot camp called Namaste React and I have been very grateful for it. I have taken some amazing explanations from there and decided to make a mini documentation of it here. I hope it helps you too.
Sometimes, the most effective way of understanding something comes from doing it first and then understanding it by observing how everything came together. So this blog will first explain the sequence in which you are supposed to follow, then I'll explain the working of it.
Installation
npm i @reduxjs/toolkit

npm i react-redux
A few things to note, Redux toolkit is a newer version of the actual Redux library, this blog will only consist of the newer version as it is simpler.
What is this react-redux library? this helps us to communicate between react and redux, as the name suggests.
We will be taking a shopping cart example for the working of the app.
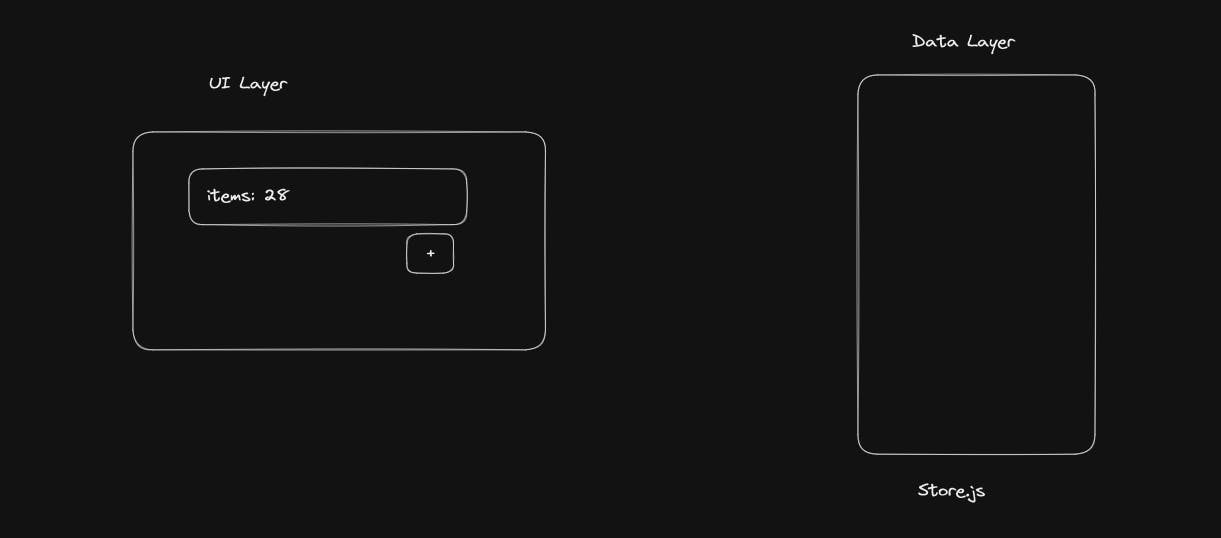
Create a store
Make a separate folder, like ../src/utils and create a store.js file. It acts as a central place to access all our data.
import {configureStore} from "@reduxjs/toolkit"

const store = configureStore({});

export default store;
Now provide it to all the components
For most cases, you will need it accessible to all the components in your application, so you can provide the store right in the App.js file
import {Provider} from "react-redux";
import store from "../utils/store";


const App = () => {
    return(
        <Provider store={store}>
            <comps/>
        </Provider>
    )
}

export default App;
So far we have established a store and provided it to our layer
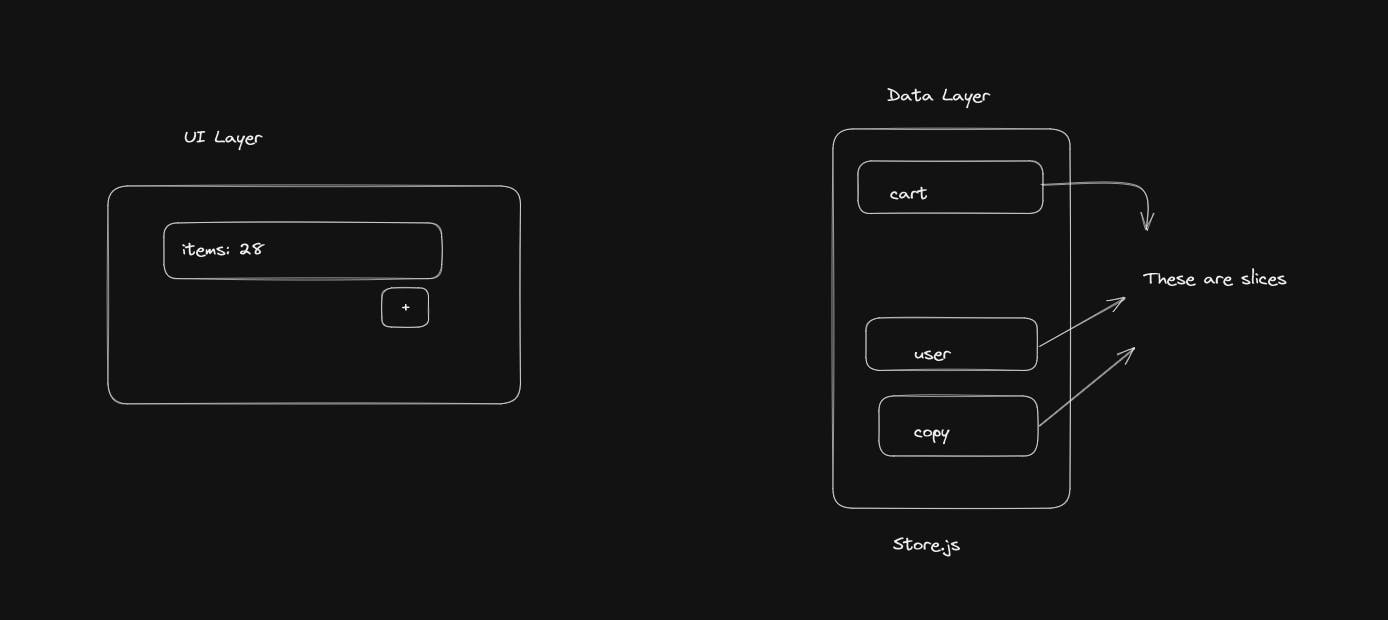
Create a Slice and add it to the store
Consider a slice as something that's dedicated to holding a specific portion of data, this helps us to be organized and not mess up our data.
import { createSlice } from "@reduxjs/toolkit"

const cartSlice = createSlice({
    name: 'cart',
    initialState: {
        items: []
    },
    reducers: {
        addItem: () => {}
    }
})

export const {addItem} = cartSlice.actions;
export default cartSlice.reducer;
To create a slice you need a name, initialState and reducers.
A name to identify the slice
An initialState where we declare variables that hold our data
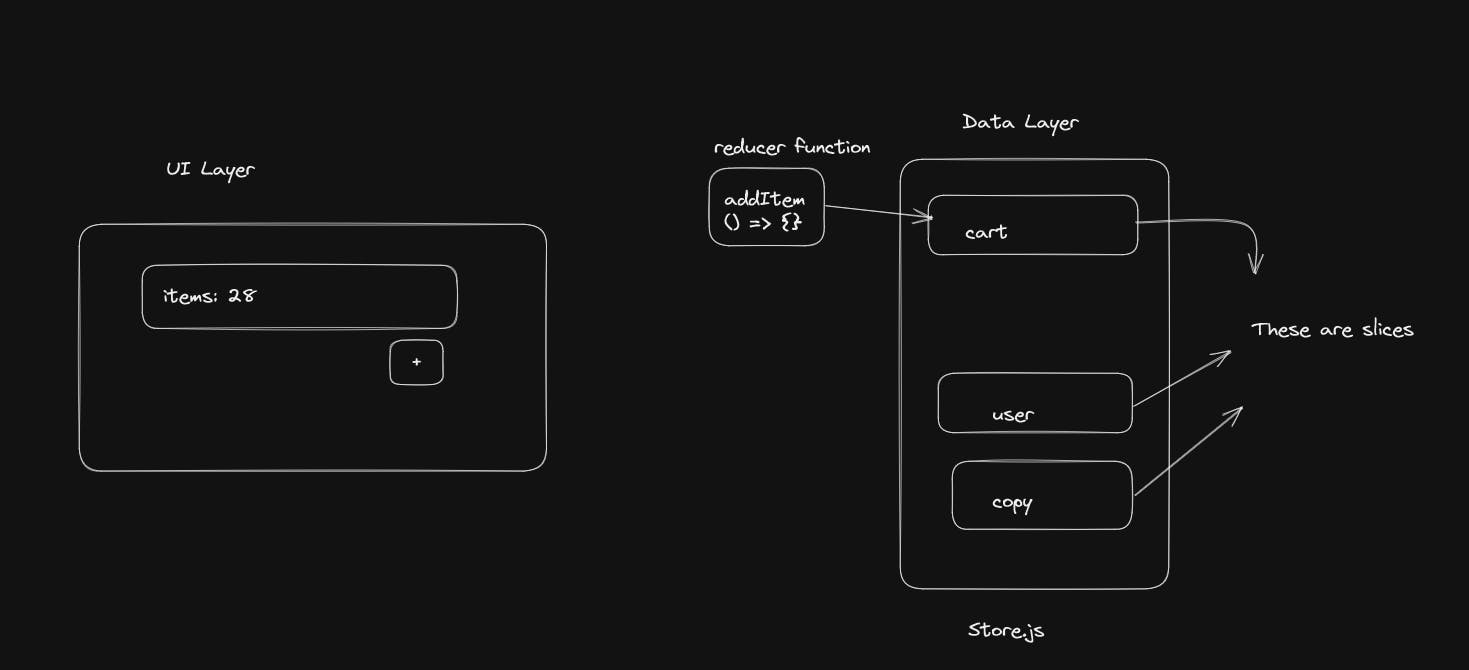
Reducers, these are nothing but functions we use to modify our state like adding and removing data from it
Add the slice to our store (in the store.js file)
import {configureStore} from "@reduxjs/toolkit"
import cartSlice from "./cartSlice";

const store = configureStore({
    reducer: {
        cart: cartSlice,
    }
});

export default store;
Till here we have set up a store with a slice in it
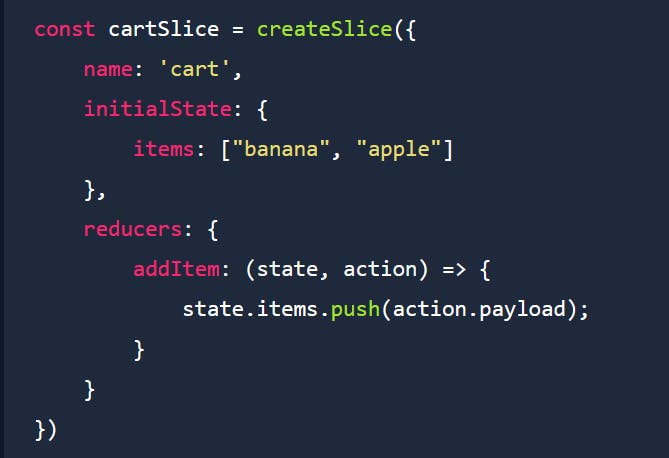
Now let's make a working function/reducer that adds an item to the slice
import { createSlice } from "@reduxjs/toolkit"

const cartSlice = createSlice({
    name: 'cart',
    initialState: {
        items: ["banana", "apple"]
    },
    reducers: {
        addItem: (state, action) => {
            state.items.push(action.payload);
        }
    }
})

export const {addItem} = cartSlice.actions;
export default cartSlice.reducer;
addItem takes two arguments, a state and an action
state is the current/initial state. It gives access to all the variables in our initialState so that we can perform some operations on it
action contains the data coming in with which we want to perform the operations.
To access the data passed in we have to use action.payload
Do not return anything in a reducer function (like addItem), always take the state and modify it
So far, we have created a slice with a reducer function that helps us to add an Item in our cart slice
First, let's read the contents of our slice
To read the contents of our slice, we will need the help of a selector to subscribe to the store. Think of subscribing to a slice as always being connected to the slice, it will automatically update whenever there is a change in the values.
Go to a component where you would like the values to be read, in our case it would be something like a Cart.js file where we have all our items stored in and need to show the number of items we have stored in
import {useSelector} from "react-redux"

const CartItems = () => {
    const cartItems = useSelector(store => store.cart.items);
    return(
        <div>
            {
                cartItems.map(item => {
                    return <h3>{item}</h3>
                })
            }
            <p>Total cart items: {cartItems.length} </p>
        </div>
    )
}

export default CartItems;
useSelector at the end of the day is a function provided by react-redux library to subscribe to a store. Always subscribe to the specific part of a slice so that you don't bloat your component with unnecessary information and result in a slow application.
Thus, we now have achieved a way to get info from our store
Let's modify our store
Let's make a button where we add an item called "grapes" to our store
import { addItem } from "../utils/cartSlice";
import { useDispatch } from "react-redux";

const AddButton = () => {
  const dispatch = useDispatch();

  const addToStore = () => {
    dispatch(addItem("grapes"));
  };

  return (
    <div>
      <button onClick={() => addToStore()}>Add grapes</button>
    </div>
  );
};

export default AddButton;
So how does this work?
First import the reducer function you have to use. In this case, it's the addItem
Next, import useDispatch from react-redux
Why do we need a useDispatch? it's used to dispatch an action that calls the reducer function. Remember how we exported addItem in our cartSlice? Don't scroll up, look here

Now this action will call our reducer function and perform the necessary actions which we specified in the reducers of our cartSlice
This is just an architecture thing of redux
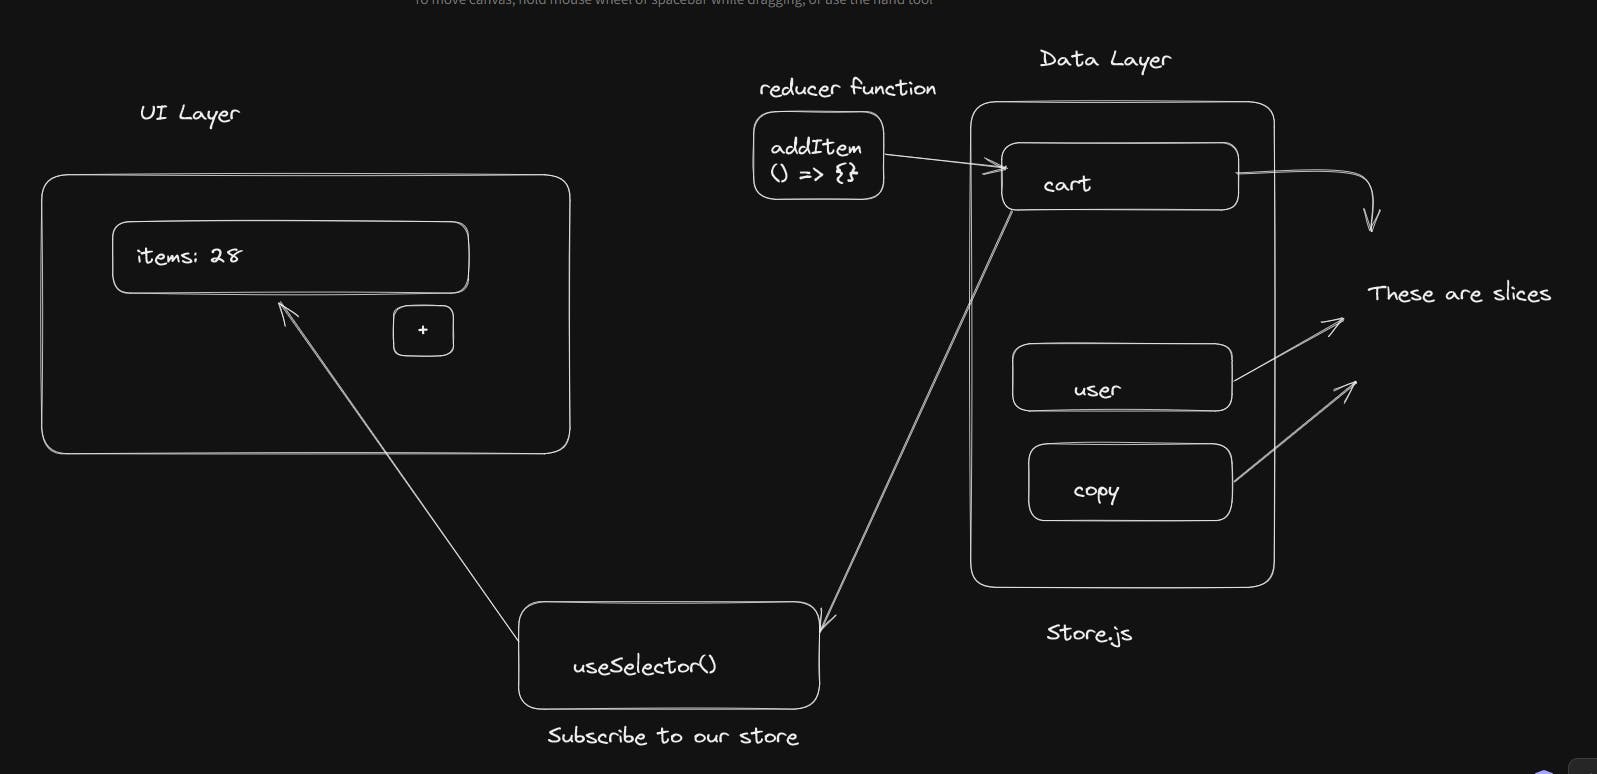
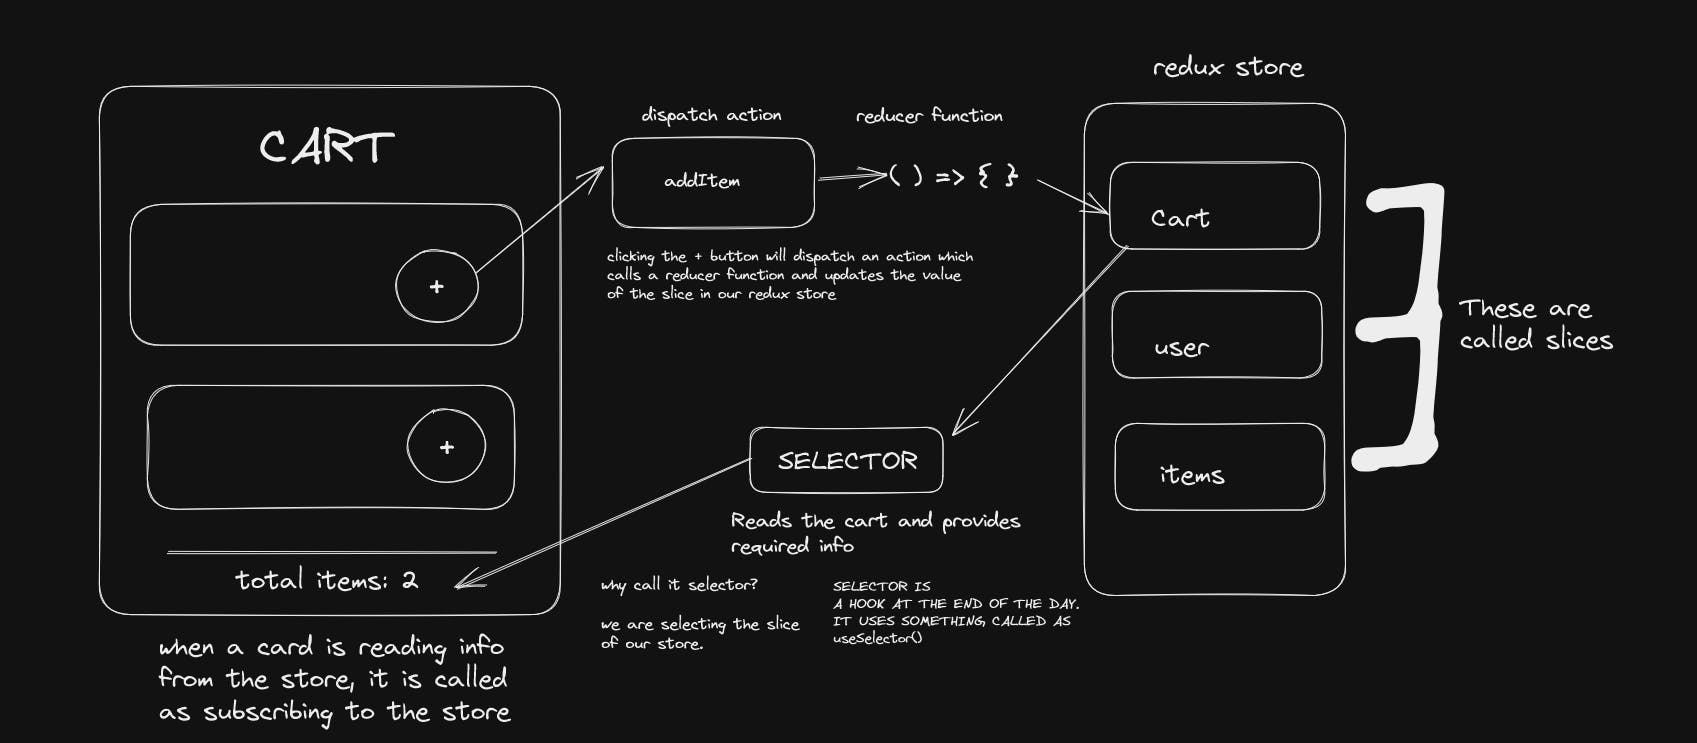
At the click of a button, we dispatch an action that calls the reducer function to update the slice of our store.
A diagram to represent how it all comes together
Here's a codesandbox for you to play around with.
Hope this blog helps you in understanding how it all works with the redux toolkit. If I have mistaken something then please feel free to let me know!
Cheers!🍻