Photo by Firmbee.com on Unsplash
A straight-forward manual to integrate Razorpay payments on your website
Here's how to send custom data and auto capture payments made through Razorpay's payment button on your website.
Unsolicited opinion: If you are new to this then try every other payment platform like Setu API, Juspay and Paytm before committing to one due to many issues that arise with the way these platforms are built. Basically, from a top view, pick the platform with problems you are okay to deal with.
This blog is meant to serve as a how-to guide / Kickstarter template on how Razorpay's payment button can be used to
accept payments from customers
auto-capture the payment (without going into the dashboard and clicking
capture the paymentbutton each time someone makes a payment)send custom data with the payment to automate backend processes like sending emails, invites etc.
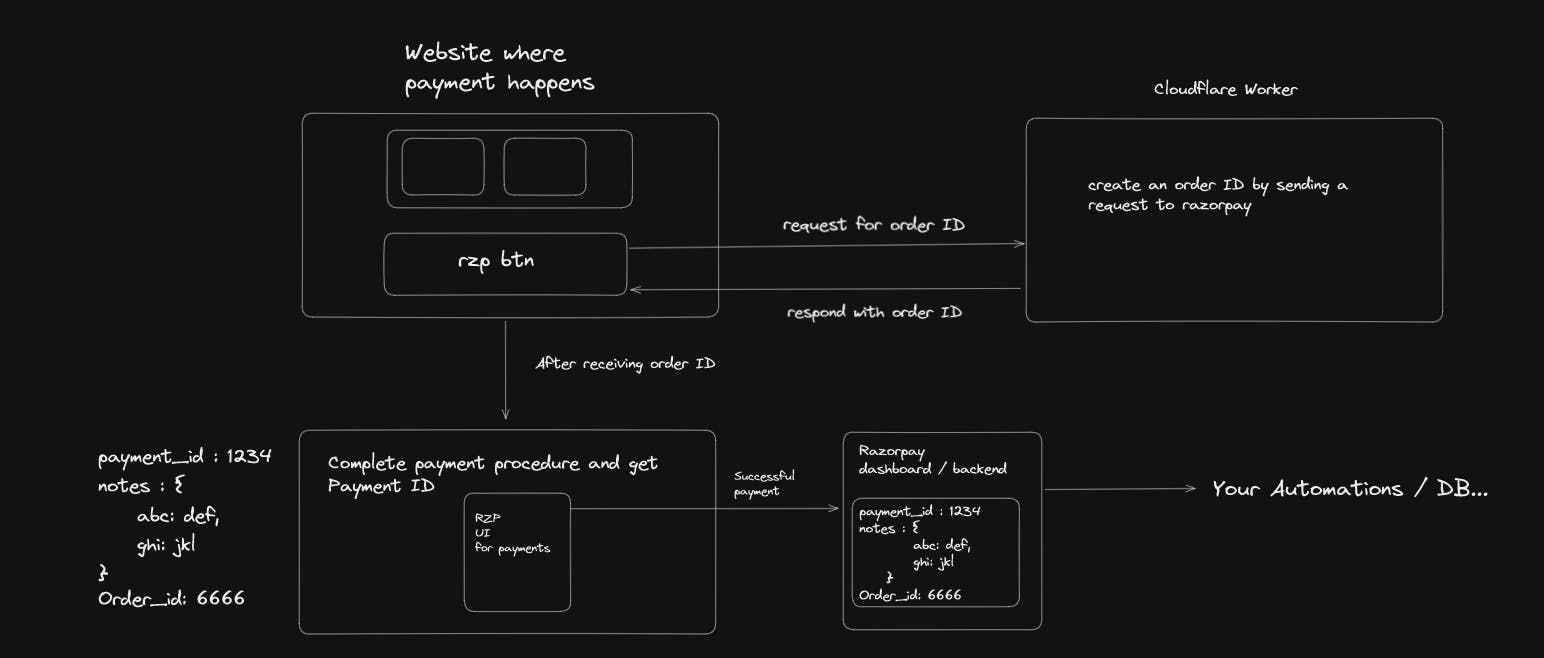
Architecture / Overview

Here's the flow of events that will happen when the user initiates a payment (clicks on the payment button)
Upon clicking the payment button -> send a request for an order ID
A Cloudflare worker will initiate a request to Razorpay for an order ID just for this transaction and send back a response with the order ID to the client
Upon receiving the order ID -> show the options available for a payment
After successful payment by the user -> send a
notesobject with the payment ID and Order ID which will reflect on the dashboard.
Use the notes object contents to identify which automation needs to be triggered on your backend processes.
But why do we need an order ID in the first place?
Without an order ID, Razorpay will not auto-capture any payments that occur on your platform. Somebody will have to go into the dashboard and manually select either of the options capture and refund (where the refund part is a whole other rabbit hole of unnecessary confusion)
Client Side - checkout.js
We will be using Razorpay's Client-side SDK for the payment button - checkout.js
<html lang="en">

<head>
    <meta charset="UTF-8">
    <meta name="viewport" content="width=device-width, initial-scale=1.0">
    <title>Razorpay</title>
</head>


<body>
    <div id="msg"></div>

    <button id="rzp-button1" class="btn btn-outline-dark btn-lg"><i class="fas fa-money-bill"></i> Own Checkout</button>
    <script src="https://checkout.razorpay.com/v1/checkout.js"></script>
    <script>
        document.getElementById('rzp-button1').onclick = async function (e) {
            // insert your cloudflare worker / serverless function link here with the amount you want to charge
            // I'm too lazy to code for and add a sub-route like /create-order but you definitely should (wrt the worker code provided below)
            const response = await fetch('http://cloudflare-worker-link.com?amount=3000', { method: 'POST' });
            const data = await response.json();
            console.log(data.order.id)

            var options = {
                "key": "rzp_test_key_id", // Enter the Key ID generated from the Dashboard
                "amount": "3000", // includes the paisa value as well, so this is 30 rupees.
                "currency": "INR",
                order_id: data.order.id, // order id generated for the trx
                "description": "Acme Corp",
                "image": "https://s3.amazonaws.com/rzp-mobile/images/rzp.jpg",
                "prefill":
                {
                    "email": "dev@example.com",
                    "contact": +919900000000,
                },
                notes: {
                    event: `Era's tour`,
                    slug: `eras-tour`
                },
                "handler": function (response) {
                    alert(response.razorpay_payment_id);
                    document.getElementById('msg').innerText = 'success';
                },
                "modal": {
                    "ondismiss": function () {
                        document.getElementById('msg').innerText = 'form closed';
                    }
                }
            };

            var rzp1 = new Razorpay(options);

            rzp1.open();
            e.preventDefault();
        }
    </script>
</body>
</html>
Server-side using the Razorpay APIs on Cloudflare workers
We will be using their APIs to request an order ID and send it back to the client. You will also need to generate a Base 64 string using your key_ID and key_Secret provided by Razorpay. You can easily get it through Postman's generated code.
var myHeaders = new Headers();
myHeaders.append("Content-Type", "application/json");
// Base 64 string generated using your key_ID and key_Secret
// best to generate it through postman's auto generate code
myHeaders.append("Authorization", "Basic base64_of_keyID_keySecret");

export default {
  async fetch(request, env, ctx) {
    const { searchParams, pathname } = new URL(request.url)
    const amtParam = searchParams.get('amount')
    console.log(amtParam);

    var razorpayRaw = JSON.stringify({
      "amount": amtParam,
      "currency": "INR",
    });

    var requestOptions = {
      method: 'POST',
      headers: myHeaders,
      body: razorpayRaw,
      redirect: 'follow'
    };

    try {
      const order = await fetch("https://api.razorpay.com/v1/orders", requestOptions);
      const originalResponse = await order.json();
      const body = JSON.stringify({ ...originalResponse });
      const responseHeaders = {
        'Access-Control-Allow-Origin': '*' // add your domain name
      }

      return new Response(body, { status: 200, headers: responseHeaders });
    } catch {
      const body = JSON.stringify({ error: "Internal server error" })
      return new Response(body, { status: 500 })
    }
  }
}
Server-side code but with Express.js and Razorpay's SDK
Note: As of writing I could not get to run this code on a worker since Cloudflare has configured its node module imports should be declared like
import * as razorpay from "node:razorpay"
and not import * as razorpay from "razorpay" which breaks all the import calls made inside the Razorpay SDK.
const express = require('express');
const bodyParser = require('body-parser');
const razorpay = require('razorpay');
var cors = require('cors')

const app = express();

app.use(cors())
app.use(bodyParser.json());

const razorpayInstance = new razorpay({
  key_id: 'KEY_ID',
  key_secret: 'KEY_SECRET',
});

app.post('/create-order', async (req, res) => {
  const options = {
    amount: req.query.amount, // Amount in paisa (e.g., 1000 paisa = 10 rupees)
    currency: 'INR',
  };

  try {
    const order = await razorpayInstance.orders.create(options);
    res.status(200).json({ order });
  } catch (error) {
    console.error(error);
    res.status(500).json({ error: 'Failed to create order' });
  }
});

app.listen(3000, () => {
  console.log('Server is running on port 3000');
});
If everything goes as per plan then something like this should be reflected on the dashboard

Now use the data in notes to do more accurate automated backend processes.
Another thing to note is that, for whatever amount you create an order ID, Razorpay will only accept payments for that amount on the client side.
I hope this was of use and saved you time! If there are any errors in this article / better ways to go about it then please feel free to comment below.
Credits: This article was only possible due to immense help from my colleagues at ownpath.
